Review Date: June 20, 2012
Category: Serious to Advanced

Photoxels Editor’s Choice 2012 – Interchangeable Lens Camera
HANDLING & FEEL
OM DNA. Since the E-PL3, Olympus has come out with a new breed of mirrorless cameras that are fast and responsive, often clocking as the fastest interchangeable lens cameras on the market. The new OM-D line brings everything up one notch by infusing the legendary OM DNA into the E-M5 mirrorless camera.

Unlike the OM 35 film SLRs, the OM-D E-M5 is based on the Micro Four Thirds system. In other words, it does not have a full frame (24×36 mm) sensor though you can use the OM lenses with the appropriate MF-2 OM Adapter (though with loss of auto exposure).
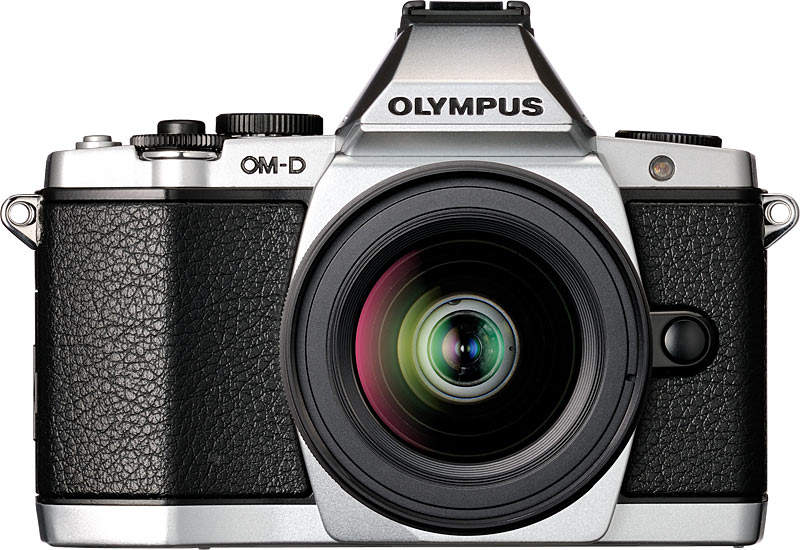
The OM-D E-M5 looks suspiciously like a slightly redesigned E-P3 with an external viewfinder permanently affixed on top. In that vein, it does not quite look like the OM-1 35mm film camera it claims to descend from — not that we were expecting it to be exactly alike. But then, we also did not expect that permanently affixing an external viewfinder to an E-P3 would qualify as a “OM-D” new design. Some people may have expressed a bit of a disappointment but Olympus E-M5 designers have chosen to continue along the line of the PEN design first introduced with the E-P1, which is a very attractive camera to start out with. So, no it does not look at all like an OM-1, but yes, it is a very attractive camera in its own right.
On the plus side, the E-M5 adds a lightweight magnesium alloy and aluminum body that is enhanced with the same dustproof and splashproof durability of the E-5 DSLR. The 12-50mm kit lens is also weather-sealed. What may not be quite apparent in the pictures is how small the E-M5 is. With the 12-50mm lens attached, it is still pleasantly light.
The Olympus OM-D E-M5 comes standard with the weather-sealed M.ZUIKO DIGITAL 12-50mm EZ ED F3.5(W)-F6.3(T) kit lens which is not collapsible and definitely much better than many of the starting lenses usually packaged with cameras these days. The 24-100mm [equiv.] lens provides 4.2x optical zoom, which you can invoke manually with a totally manual zoom ring or using a totally silent power zoom ring [perfect for zooming during movie recording]. You engage one or the other by simply pushing or pulling the Zoom Ring. It also has a manual focus ring (fly-by-wire) that works very well and will automatically enlarge the display for a closer look.
[Note that you can also buy the E-M5 with a 14-42mm collapsible kit lens, but we’d definitely recommend the 12-50mm lens.]The starting focal length is a wide-angle 24mm (equiv.) and the 100mm (equiv.) medium tele makes the OM-D E-M5 a nice camera for street and portrait photography. Of course, as an Interchangeable Lens Camera, the OM-D E-M5 accepts a growing number of Four Thirds lenses as well as lenses from other lens manufacturers when using the appropriate adapter.
The front of the camera is clean, with the Self-timer lamp/AF illuminator and the Lens Release Button on the right. There is not really a handgrip, just a sharp bulge for your fingers to grip on, but the textured body helps to hold the camera securely. A curved thumb rest at the back provides a “thumb grip.”
Those who desire a more substantial handgrip can add the optional Power Battery Holder (HLD6), which is a combination dust- and splashproof battery holder and grip. The device can be separated into two parts — one tailored to shooting in landscape orientation and one that’s ideal for portraits.

There is no built-in flash. However, an external clip-on flash FL-LM2 is included as standard accessory and it slides onto the hot shoe and into the Accessory port. You lift it up to turn it on, but regretably you cannot bounce the light. It is good enough for fill-in at up to 10 feet and can even wirelessly trigger the optional Olympus speedlights.

The top of the camera has, from right to left, the Fn2 button, Movie Button, Shutter Release Button, Sub dial around the Shutter Release Button (defaults to shutter speed), Main Dial (defaults to aperture), Hot Shoe, Stereo Microphone (on each side of the viewfinder), and Mode Dial on the left of the viewfinder. The design decision to expose the Main and Sub dials (which are usually hidden inside the camera body on other DSLRs, with only the tip of each protruding out for dialing) means that the Power button, usually around the Shutter Release Button, is now on the back of the camera and the Mode Dial is on the left side of the viewfinder.
If you look carefully on the right side, you’ll see two button protruding quite a bit from the back of the body. They are the Playback and Fn1 buttons, and require manual dexterity using your fingertip to press. In fact, all the buttons on the E-M5 are tiny. Not small, tiny. They also each seem to have different tactile feedback, so it can get pretty confusing about the right amount of pressure needed to engage one. This may or may not be a problem for you, but we definitely recommend that you try before you buy. [And even then, give it a good week or so and try and see if you adjust to them, as I did.] You will not be able to operate the E-M5 with winter gloves on.
Startup is fast at less than 1 sec. (from Power ON to LCD ready for capture, i.e. time-to-first-shot). Shot to shot times is about 0.7 sec. (14 shots in 10 sec. in M mode, 1/125sec.) in JPEG. You can take one shot after another, as fast as your finger can click the shutter. Using RAW, it’s also that fast but the buffer seems to fill up after the 24th shot, when it starts to slow down as the buffer clears more space.
At Image Quality = Large Fine, a 16.1MP JPEG image is compressed down to anywhere between 6MB and 12MB. A RAW image occupies about 15MB.
In good lighting, there is no practical shutter lag and AF is lightning-fast. In low lighting, AF is also fast but may require up to 1 sec. to lock focus, depending on the contrast of the subject. However, it all just feels very fast overall.
The Mode dial has iAuto, PASM, Movie, SCN, and ART. You invoke Program Shift and/or Exposure Compensation by pressing the UP ARROW. Then use UP and DOWN to program shift or LEFT and RIGHT to dial in an exposure compensation. The Mode Dial can be conveniently rotated freely in any direction.

On the back of the camera, there is a 3.0-in. OLED (610k-dot) that is tiltable up 80 degrees and down 50 degrees. The OM-D E-M5’s OLED is touch screen, allowing Touch shutter release, Touch enlargement, Touch Live Guide, AF area selection, AF area enlargement, Frame advance/backward, Enlargement playback, and Touch Super Control Panel.
The tiltable OLED touchscreen takes up the whole left side on the back. On the top right are the two protruding Playback and Fn1 buttons we made reference to earlier. On the right, below the thumb grip, are Menu, Info, Arrow Pad with the OK button in the middle, Erase and Power ON/OFF switch. On the left side of the viewfinder is the Diopter Adjustment Dial that is quite difficult to set; on the right side is the OLED/Viewfinder button.
Arrow Pad: UP = Program Shift/Exposure Compensation. RIGHT = Flash. DOWN = Drive. LEFT = AF Area. The Arrow Pad is not labeled, so you need to memorize what each key does. The Arrow keys are also angled toward the central OK button. I guess the design decision here is that you’d rest your thumb on the OK button and just need to move it a bit UP, DOWN, LEFT and RIGHT to invoke whatever functions are assigned to the keys. However, in practice, your thumb is on the thumb rest and when you bring it down to press one of the keys, you disconcertingly find only a thin sliver of key to contact with.
Once set, the Exposure Compensation Indicator conveniently stays displayed on screen until it is reset to “0” so don’t forget to do that. Note that the exposure compensation value selected is retained even when the camera is turned off (so remember to reset to “0” after using it or the next time you turn the camera on, your shots may be over- or under-exposed.) Note that, if you set Live View Boost ON [MENU – Custom Menu – Disp/Remote/PC – Live View Boost – ON], the screen is always bright and brightness does not increase or decrease to reflect the value of exposure compensation you dial in.
You can display a Live Histogram on the OLED screen and/or EVF [MENU – Custom Menu – Disp/Remote/PC – Info Settings – LV-info – Histogram – ON]. Youi can also display a Grid [MENU – Custom Menu – Disp/Remote/PC – Displayed Grid – Select one of 5 grid types]. You can have both the grid and Live Histogram displayed at the same time. You can also choose to display Highlight&Shadow [MENU – Custom Menu – Disp/Remote/PC – Info Settings – LV-info – Highlight&Shadow – ON].
For those who, like me, are horizontally challenged, you can set the Level Gauge on: [MENU – Custom Menu – Disp/Remote/PC – Info Settings – LV-info – Level Gauge – ON].
Note that to see the Live Histogram, you need to repeatedly press the INFO button until the Live Histogram displays on screen. Likewise, repeatedly press INFO until the Level Gauge displays. Pity you cannot have both histogram and level gauge displayed at the same time.
The EVF has an impressive 1.44 million dot resolution. A diopter adjustment dial is on the left of the EVF and is pretty hard to set; however, once set, it won’t accidentally budge. A built-in eye sensor switches the view automatically between the EVF and OLED screen.

The OLED display screen resolution is a high 610k-dot. In low light, the screen gains up slightly. Manual Focus itself is quite nice with the screen zoomed in and the fly-by-wire manual focus ring is very responsive. You can zoom and either set continuous focus on or manually focus during movie recording. The sensitive microphone will pick up every little scrap of sound you make, even as you turn the zoom ring. That’s where the brillant Power Zoom comes in handy: it’s totally silent and buttery smooth!
You can shoot a movie, press the shutter release button to take a single picture, and the camera will just pick up almost where it left off (you lose about 2 seconds) and just keep on shooting your movie. Three files will be recorded: the movie before the still picture, the still picture and the movie after the still picture.
I like AF Target [LEFT ARROW] that gives 7×5 = 35 focus points. (Unfortunately these avoid a large swatch of the screen edges.) Then it’s simply a matter of touching the AF point you want the camera to focus on. In Record mode, if you’ve set AF Touch on, touching the screen will cause the camera to immediately focus on that point. If you’ve set Touch Shutter Release on, then the camera will focus AND take a picture as soon as you touch the screen.
You can customize the OK button to either pop-up a Quick Menu (Live Control) or a Super Control Panel (SCP).
To set up for a Quick Menu: [MENU – Custom Menu – Disp/Remote/PC – Control Settings – P/A/S/M – Live Control – ON].
To set up for a Super Control Panel: [MENU – Custom Menu – Disp/Remote/PC – Control Settings – P/A/S/M – SCP – ON].
Note that if you set both to ON, the Live Control takes precedence.
You can pretty much customize the OM-D E-M5 to the way you want it to work. There are lots of customization available, more than anyone would ever use in my opinion, as though the menu designer wanted to make all possible options available — just for the heck of it. So, take the time to delve into the Instruction Manual (on the CD) and customize the camera to the [idiosyncratic] way you prefer. But we caution the beginnner not to try to customize too much or they may end up totally lost. If this is the case, Reset the camera and start again, one function at a time.
TIP: There are in fact 5 customizable buttons: besides the 2 Fn buttons, you can also customize the One-button Movie record button, the RIGHT arrow and the DOWN arrow. [MENU – Custom Menu – Button/Dial – Button Function].
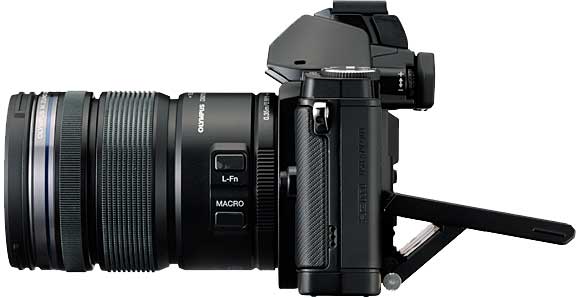
The 12-50mm lens also has a L-Fn button that you can customize. One of the possible option is AF Stop. The manual is wrongly worded and here’s how AF Stop works: first lock focus (using AF or manually) to where you want, then holding the L-Fn button pressed down, recompose and when you click the shutter, the camera will not refocus. Other options for the L-Fn button include: MF, DOF Preview, AEL/AFL, etc.
Another button on the 12-50mm lens is a MACRO button. To engage macro, hold the MACRO button down and slide the Zoom Ring all the way forward. You can now focus the lens from 0.2 to 0.5 m (20 to 50 cm). In practice, the lens seems to be able to focus much closer than that and, as long as you get a successful focus lock beep signal, you’re good to go.
TIP: The Erase button can be customized to delete a picture immediately [MENU – Custom Menu – Record/Erase – Quick Erase – ON]. This can be a convenient and quick way for experienced photographers to review a picture on the LCD screen and then delete it with one button press. It can also be extremely dangerous for those who are trigger happy: press this button inadvertently and the picture you are looking at is forever gone. Use with extreme caution.
I find the menu structure can be quite confusing to navigate, even for an advanced user. It is not apparent which option will eventually lead to the function you want to set and you can spend a frustrating time finding what you want to customize. Definitely, bring the CD with you (the detailed Instruction Manual is on the CD) or copy the manual to your hard drive.
The Fn1 and Close up Playback buttons are in the traditional space reserved for a zoom toggle button on compact cameras. They serve the traditional purpose of looking at thumbnails or enlarging your picture in Playback mode.

I love a tiltable LCD and consider it a must on any serious camera these days. Tilt up is all I really need, allowing me to comfortably look down on the screen when shooting down low (macro photography) or when the camera is on a tripod. I rarely use the viewfinder (because they are all still way too small for my taste (now, the OM-1 optical viewfinder was a thing of beauty: large and bright), prefering the larger screen of the LCD. I also almost never shoot above a crowd, so almost never find the need to tilt the LCD down. Which brings up a sore point about the E-M5’s OLED screen: it’s so hard to tilt up (unless you apply force) and it’s almost as if you MUST tilt the screen down first before you can easily tilt it up. So, instead of a smooth one tilt up, it becomes for me a 3-part process: tilt up (oops, it does not work), [frustrating sigh], tilt down, tilt up. Those who take lots of pictures in the portrait format would of course prefer a fully articulated display screen.
Also [barely] visible in the picture above is the small notch that you access to open the Connector Cover (HDMI, USB and A/V OUT). But to see and access this notch you must first tilt the OLED screen down a bit. This business of tilting the screen down first is simply an unnecessarily frustrating design decision.
On the bottom, the tripod mount is metal but, surpringly in a camera meant for advanced users, not in-line with the lens.
Included in the box is a rechargeable Li-ion battery BLN-1 that can take about 360 shots (IS ON, CIPA standard) on a fresh charge. A Battery Charger BCN-1 recharges a depleted battery in a long 4 hours.
The Olympus OM-D E-M5 accepts the SD, SDHC, SDXC and Eye-Fi memory cards.
Overall, the build quality is very good, especially when you throw in weather-proofing for both camera, lens and flash. Some may miss a handgrip. The Olympus OM-D E-M5 handles well and, once you take the time to customize it to your liking, and take some time to get used to it, you’ll find it operates with minimum or no frustration.
Next: Olympus OM-D E-M5 User’s Experience


